
When you have shot for a while and are (hopefully) shooting quite well, then you ought to think about the more advanced set up of your bow and tuning it in properly. Although gadgets are no remedy for bad shooting, having a well-tuned bow will make shooting it feel nicer, and add some points to your score, especially outside.
If you don’t understand something, check the Jargon page.
For the long, detailed version of these instructions, check the Easton Tuning Guide or the Recure Bow Equipment Tuning section of the WA Coaching Manual Level 2 (from page 171).
Also here are our presentations on: Setup and Tuning
Bracing Height
Bracing height is the distance from the nocking point (string) to the centre of the button. To measure it you clip a bracing height gauge to the string, and put it’s edge (make sure to use the inches side) in line with the centre of your button. When you bought the bow, you were probably told amongst the mountain of new information, the right bracing height. If you can’t remember what it was, a basic guide for a 68″ bow is somewhere around 8½ to 9½ inches. If you can, hunt down the manufacturer (with your internet/phone, not your bow!) and see what they recommend for the model you have. Other people in the club may also be able to help you. There are usually about 2 or 3 bracing heights that suit the bow well inside the range specified for it, like resonant frequencies, but in these cases they damp the bow better than any other lengths. It is best experimenting, and when you get confident you might find it works better outside these limits. One point of note is this, a longer bracing height will give a shorter power stroke for the same distance pulled back because it reaches this length faster than a short one. Also, a longer bracing height means that more energy has been wasted holding the limbs bent permanently when it could be imparted onto your arrow. Therefore a lower bracing height would seem the way, but too far and the limbs will probably not be synchronised properly, making the shot ‘unclean’. To increase your bracing height (bring the string further away from the riser) you need to put more twists into the string, and remove twists to decrease it.
Tiller
Tiller is the difference in the distances between the top and bottom limbs and the riser. It is affected by how much the limb-bolts on the riser are wound in. To measure tiller, clip a bracing height gauge to the string and rest its edge on the top of the riser. Choose a constant point on the edge of the limb (e.g. the boundary between layers of different materials in the limb) and read off the value. Move the gauge to the other limb and measure the reading at the same point as you did the first. 1/8″ positive tiller means that the top limb’s reading is 1/8″ larger than the bottom limb’s. Because modern target archery uses three fingers, one above, two below, it means that the bottom limb is usually put under more stress than the top one. This means that (as a general rule of thumb) your tiller should be a positive 1/8ths of an inch. To increase the distance between a limb you need to wind the limb-bolt out, and vice-versa to decrease the distance.
Button pressure
To change the pressure of your button, loosen the tiny locking grub screw furthest from the riser. Screw the big screw on the end in or out (in = stronger, out = weaker), making sure to count how many quarter-turns you do. Re-tighten the locking screw. Some buttons also come with different strength springs which can be swapped in. To determine what pressure you need, see the section on bareshaft tuning below.
There is an upper and lower limit to how much button pressure can be adjusted:
- It must not be so weak that the plunger does not spring all the way back out.
- It must not be so weak that it is depressed by the force of the clicker on the arrow.
- It should not be so stiff that the plunger does not depress all the way in.
- Do not adjust the strength of your button higher or lower than these limits. Further tension changes may be made by replacing the spring inside with a stronger or weaker one.
Centreshot
Centreshot is a measure of where the arrow points in the first place. Nock the arrow and hold the bow out in front of you, looking down the arrow. Line up the string with the centre of the bow and see where the arrow is in relation to the string. For right-handed archers, the point of the arrow should be seen to the left of the string. This is the most widely recognised compensation for using a finger-release. Of course, this works the other way round for a lefty. To adjust centre shot you need to undo the grub screw at the front of the button and move the collar to the correct position.
Limb Alignment
Looking at the back of the bow, you should be able to line the string up so that it passes through the centre of each limb bolt on the riser and the centre of the long-rod.
If it doesn’t, most risers allow you to adjust the limb pockets to fix this. If not, your limbs or riser may be defective and should be replaced.
Bareshaft Tuning
When you can shoot groups at a distance, you can use bareshaft tuning to determine the correct nocking point and button pressure for your arrows.
- Shoot a group of fletched arrows and 1 or 2 bareshafts (unfletched arrows)
- Note where the bareshafts land relative to the group (above/below & left/right)
- Repeat until the relative position of the bareshafts is consistent between ends
- Adjust one of the following variables at a time and repeat until the bareshafts are inside the group
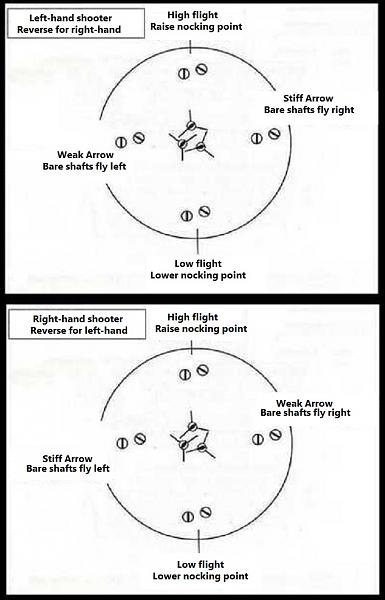
Bareshaft to the left (for a righthanded archer):
This means your spine is too stiff so do one of the following (opposite for a left-handed archer):
- Increase bow poundage
- Increase point weight
- Decrease button tension
Bareshaft to the right (for a righthanded archer):
This means your spine is too weak so do one of the following (opposite for a left-handed archer):
- Decrease bow poundage
- Decrease point weight
- Increase button tension
Bareshaft above group:
This means your nocking point is too low so move it higher
Bareshaft below group:
This means your nocking point is too high so move it lower
The Walkback Test
Do this test after you have set up the nocking point.
When you are outside set up a boss at about 40m and pin a small piece of paper near the top of the boss to aim at. Set your sight mark for about 20 metres. Stand about 5 metres away from the boss (10 if you are using carbon arrows) and shoot about 3 arrows into the target. Mark down where they group. Now stand 10 metres back from the target (15 for carbon) and shoot another 3, noting where the group lands. Repeat this process of stepping back an extra 5 metres and shooting three arrows until the arrows land at the bottom of the boss. (Note you shoot three arrows to eliminate bad looses). At the end, you should have about 6 different groups starting from the top of the boss going to the bottom. If they are in a straight line then your button is tuned properly. If they slant to the right at the bottom like this \ then you need to increase your spring tension. If they slant to the left / then you need to decrease the tension. If there is a C shape then you need to move the whole button into the bow. If the C shape is facing the other way like this ), move the button out of the bow.